This discussion focused on how to use Edge DX to get drive type (SSD, HDD) information into Edge DX in multiple ways. The user initially wanted to see if the laptops they were using had SSDs or HDDs to troubleshoot a performance issue, and instructions were provided for manually and semi-automatically collecting the data. Edge DX also enables the user to create custom reports and set up persistent data collection, and includes a script to collect CPU temperature. The ControlUp Scripting Guide can be found at https://support.controlup.com/docs/scripting-guide.
Read the entire ‘Gather Drive Type Information with Edge DX’ thread below:
Recently deployed 1000+ Edge DX agents and trying to dig into a user endpoint issue this morning. Looking at all the device information and metrics and not seeing the endpoint drive type. Is there a way to get that information into Edge DX? Total newbie so I apologize if I’m missing something obvious.
What do you mean with "drive type"?
Any screenshots you can provide would be very helpful.
Edge shows drive size, but I was hoping to get drive type: SSD, HDD.

Not out of the box, but if we can pull it from the operating system, we can use the agent to pull the data and add it to an index and report on it
@member this is probably not too complex?
That would be awesome and useful; maybe should be added to a feature update?
Yup. I am on it. Should be pretty easy. The short answer is PowerShell
Get-PhysicalDisk | Format-Table -AutoSize
But I will do a better writeup for you this afternoon.
To get it formated for dataindex
Get-PhysicalDisk | select MediaType, OperationalStatus, Size, FriendlyName, Manufacture, Model | ConvertTo-Json
@member this is probable more information then you asked for but I have been meaning to do a blog on just this subject SOOO Here is a rough draft I put together. I broke it down in a couple different ways you can get this information.
Can I ask what the use case is for this report are you looking at replacing the HDD with SSD or do you have another reason you want this information.
Manually, For a Few Devices
Suppose you only need to gather the information from a few devices. In that case, the quickest way is from the device’s homepage, selecting Remote Shell from the Assist drop-down menu, bringing up PowerShell, and entering Get-PhysicalDisk | Format-Table -AutoSize.
The output from the command shows that this device (NUC13PRO-A) has two disks on a USB drive with an unspecified media type, while the other is a Samsung SSD drive.
This is a quick way to gather information about a single device.

Semi-Manually, For a Multiple Devices
If you need to gather additional information on a few select devices on an ad-hoc basis, creating a script and selecting the devices to run it on would be best.
To create the script, click the Configuration icon in the upper right of the dashboard. From this page, select Scripts from the navigation pane. Select Add Script. Enter a name in the Name text box (i.e., Win_Disk_Info). In the Content text box, enter the command you want to run. Set the Platform and Language fields, and select Custom Action- System from the Trigger drop-down menu. Click Create Script.
The content is a little bit more involved.
[Console]::OutputEncoding = [System.Text.Encoding]::UTF8 # This line is added automatically to help with Unicode characters. Please add your code below
$reults=Get-PhysicalDisk | Format-Table -AutoSize
## Write-Output "### SIP EVENT BEGINS ###"
## Write-Output $results
## Write-Output "### SIP EVENT ENDS ###"
[array]$arrSysInfo = @()
$arrSysInfo = Get-PhysicalDisk | select MediaType, OperationalStatus, Size, FriendlyName, Manufacture, Model | Format-list
Write-Output("### SIP EVENT BEGINS ###")
Write-Output $arrSysInfo
Write-Output("### SIP EVENT ENDS ###")
To see more information about the scripts in Edge DX, visit https://support.controlup.com/docs/scripting-guide.
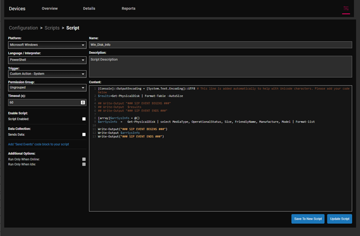
You can now go to a device’s home page and select the script from the Action Drop-down menu. The results will be seen by clicking the Device Events tab.

To run the script on multiple devices simultaneously, go to the Details home page and filter to only show online Windows devices.
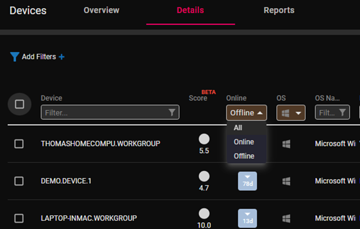
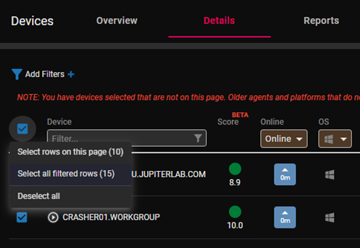
You use the checkbox on the top row of the device to specify if you want to run the script on all the devices on the page, all those that you filtered on, or you can manually select the devices. I chose to Select all filtered rows.
From the Actions (right arrow in a circle) drop-down menu, select the script you want to run (i.e., Win_Disk_Info.)
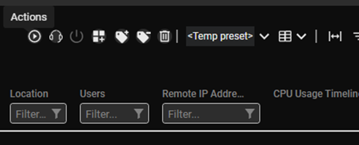
This will execute the script on all the devices that were selected.
To see the results, go to each device’s home page as shown above or to the Configuration page and select System Events to see the output from all the devices. If other events are interspersed in the events, you can filter on the script using the Title column.
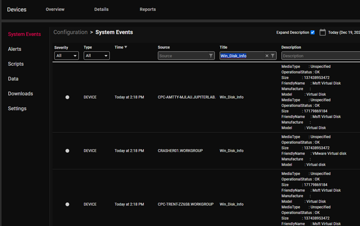
You can select Export to CSV to do further work with this output. But if you export it, use filters only to export the needed information.
This is a great way to gather information that is only needed occasionally. There are occasions when you want to capture the information regularly to see the latest information or to detect changes in systems; this is where Edge DX shows its power.
Persistent Data Collection
To keep track of the latest device changes, you can use Edge DX’s powerful and open database!
You will only need to modify the script we used to collect the data and write it to a data index by including the SIP DATA stanza. Leaving the SIP EVENT stanza in will also be written as a device event, but this is not required.
[Console]::OutputEncoding = [System.Text.Encoding]::UTF8 # This line is added automatically to help with Unicode characters. Please add your code below
$reults=Get-PhysicalDisk | Format-Table -AutoSize
## Write-Output "### SIP EVENT BEGINS ###"
## Write-Output $results
## Write-Output "### SIP EVENT ENDS ###"
[array]$arrSysInfo = @()
$arrSysInfo = Get-PhysicalDisk | select MediaType, OperationalStatus, Size, FriendlyName, Manufacture, Model
Write-Output("### SIP DATA BEGINS ###")
Write-Output $arrSysInfo | ConvertTo-JSON
Write-Output("### SIP DATA ENDS ###")
Write-Output("### SIP EVENT BEGINS ###")
Write-Output $arrSysInfo | ConvertTo-JSON
Write-Output("### SIP EVENT ENDS ###")
Selecting the Sends Data checkbox and entering a name for the data index (i.e., Win_Disk_Information) will automatically create and write the collected data.

As the trigger is set to Custom Action – System, you can run it as you would as you would as you did before on one or multiple devices.
Once the script has been run, you will see the data index by selecting the Configuration page and Data from the navigation pane.

Selecting the data index will display all the values it collected and information about the device it was collected from.
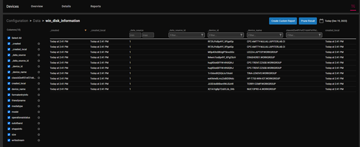
You can select the columns you want to display in the left hand.
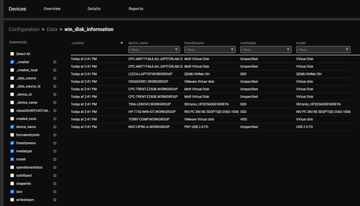
Custom Reports
Once you have displayed the data, select Create Custom Report to access the information quickly.
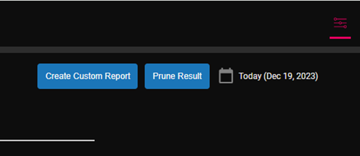
Put the values you want in the pop-up Wizard, click the Publish checkbox, and click Create.
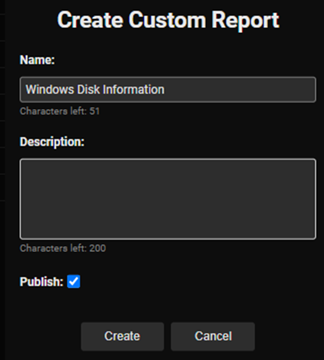
The report can be viewed by selecting the Reports tab. I like using the table view (set in the upper right corner) and using the Name filter box to find my reports.

Once a report is displayed, it can be edited, exported as a CSV file, deleted, or filtered to show on the SSD or HDD drives.

Automated Data Collection
So far, we have covered collecting data as needed. Still, you can also automatically collect data on a schedule when a device is powered on (SIP Service Start), when a user logs on, or when another event occurs.
To do this, edit the script and select the Trigger you want to set off the script. I decided to have it run Once a day. Make sure to click Update Script once you have changed the trigger.

You can now view this information from your Custom Report.
Although Edge DX collects the information most users need, it also enables the collection of additional information and allows users to display information in ways limited only by their imagination.
Actually, I was trying to troubleshoot one of my VM users, complaining about perf. degradation and a funny noise he heard from his laptop (not VM-related). He thought it was the HDD, but I was "almost" certain all our laptops had SSD. I was trying to confirm it was SSD but surprised that info wasn’t captured by Edge DX agents. I did the Assist –> remote shell and started PS and ran your awesome PS snip and got the info I need. Now just need to create a custom report to grab that info for all endpoints as it seems like it would be useful HW inventory info to have.
DM your email if you want me to send you a word version of this
Doing that now. You are absolutely a freakin’ Rock Star.
Cool and great use case. I am also working on a way to automate gather the SMART health from SSD drives.
I would bet that it is the laptops fan. 🙂 We have a script to collect CPU temperature which may coincide when they hear the noise. Let me look around and see if I can find it, but it will be tomorrow before I get to it.
That’s exactly what I told the user; nothing else is moving! But I’m a Windows Server and Citrix guy, not a Desktop Support Technician. I told him to open an IT Support Ticket before it fails and he is down. Thanks for all your help today! And Merry Christmas!
Most CPU throttle down when the run hot so that would kind of explain it.
And Merry Christmas to you too!
If you’re a Citrix guy you’re a desktop guy 😉
Have a wonderful Christmas!
Continue reading and comment on the thread ‘Gather Drive Type Information with ControlUp Edge DX’. Not a member? Join Here!
Categories: All Archives, ControlUp Dashboards, ControlUp for Desktops, ControlUp Scripts & Triggers
